Thursday, August 16, 2012

PR's Buzzn: Start Up

I recently got an internship with Wolverine Solutions Inc. They launched an app called Buzzn. The app is currently offered for iPhones and will be on the android market soon.

Let me tell you a bit about the app first. I really like it. I think it is a great idea. The app allows you to share your social and academic calendars with your friends. First you create an account, add courses you are taking and events (work, meetings or social events) then you can add your friends. You can see your friends courses and events and vice versa. This makes planning around the busy college schedules sooo much easier. Here is a photo from Pic Stitch showing what Buzzn looks like.


These posts will be about things I did Buzzn or things I learned while working for them.

One thing that I've learned is people will sometimes have unrealistic expectations. I am evaluated based on how many downloads I generate for the app. My boss's boss was expecting the app to TAKE OFF right at launch. As much as I would love to see that from the app, sadly it is not realistic. For one thing, we haven't even started school yet. This makes promoting the app only possible for me over social media. I don't mind this really. I love social media. It is not the most effective way to generate downloads.

My current promotion is being done on the computer. Last night I sent out emails to roughly 100 student organizations on campus at Wayne State. I post on twitter and share Buzzn's information on Facebook. If you're reading this and you are a Wayne State student download this application! Also, please friend me (Allison Normand).

Thanks y'all

Love,
Ally Norm

Monday, August 13, 2012

Nail Tutorial: Spackle

It's my favorite day of the week. That would be Monday. It's time to do my nails :)

First I want to start with saying thank you all that have been reading my blog! I really loved seeing the numbers jump from the last time I had checked. I started this blog not thinking I was going to get as many views. I have to thank Pinterest/Twitter for getting me out there. I hope you like what you see and continue to read.

Now, back to the nails. I have said in posts before that I wanted to make my polish last longer. I am so happy to say that from my last blog post my Orly color did not chip AT ALL. I went a whole week without ANY chipping. As woman we know this is basically a miracle unless you get them professionally done. Well, I finally did it on my own :)

This week I decided to go for a sort of spackle technique. It's a very simple tutorial.

Step one: Paint your nails with the color of your choosing. I used Orly Purple Crush. I now LOVEEE this brand, as well as this color.

Step two: Get a sandwich bag and crinkle it up. Put polish on the bag. I used OPI Lincoln Park after Dark. Everyone needs to own this color. It really is the best. By the way, my grandma calls it "ohh-pie." I just can't bring myself to tell her that isn't the brand name.

Step three: Dab polish onto your nail. It's that easy.

This can get a bit messy. The photo is what I mean by messy. I know that it will come off in the shower tomorrow. That is one thing I love about painting my nails and then showering.


I've becoming known in my family for my great nail techniques. My grandma made me use the Sally Hansen nail strips on her nails. They are supposed to last up to 10 days. Hers lasted four days. They were nice enough to send her a free set. Here are what her nails look like now! The design is really cool.


That is all for now. I will be glittering shoes on Wednesday. Keep an eye out :)

Love,
Ally Norm


Monday, August 6, 2012

Nail Tutorial: Tips and Tricks

As a woman on the go, you need to do your nails in a hurry. I just recently read in Allure magazine that you should wait 25 minutes for your nails to dry. Who has that kind of time nowadays? It doesn't matter whether you're in college, a full-time job or a stay-at-home mom. We are busy women.

This blog is going to give you a few simple tricks to make your nails look great.

Trick number one: Push back your cuticles.
This is a trick that will make your manicure look better. This way the nail polish will adhere to the nail. When you polish over the cuticles the polish doesn't look smooth. I apply cuticle oil first and then push back the cuticles.

Trick number two: How to remove ripples from you nails.
Ever in a hurry to see if your nails are dry? You touch the nail and presto you can see a great finger print. There is an easy way to remove that. Go grab your nail polish remover. Put a little nail polish remover on the pad of your finger. Use slow, circular motions over the messed up area. That should cure the mishap. After you are done, apply a top coat.

Trick number three: How to remove the nicks you get.
You can remove nicks similar to the way you get rid of ripples. The only difference to this is first apply a dash of polish over the nick. Rub around the polish to even out the layers and add a top coat.

I just bought some Orly nail polish. This is the first time I used this brand. I really liked it. Here is what three coats of Jealous, Much? looks like. I love the sea foam color.

Love,
Ally Norm

Wednesday, August 1, 2012

Hiatus: Coast Guard weekend

Today is usually the day I get my craft on. I am taking a small hiatus.

I am getting ready to take a mini vacation. I leave tomorrow for Grand Haven, MI, and I come back Sunday. I am really excited. My boyfriend will get to meet my mother and stepfather. He will also get to experience one of the best weekends at Grand Haven. That would be Coast Guard weekend.

We will fill our time with carnival rides, craft shows, walks on the beach/pier and fireworks. I am really looking forward to this weekend. I am excited to see all the cool things on sale at the craft show. I know I will be buying a glass nail file! Who knows what else.

I hope that I can bring back some inspiration for my blog. I plan to take pictures. Maybe you readers will be lucky enough to see them.

I'd love to hear comments on if you tried something...Let's be friends y'all :) Did it work? yay or nay? Do you like what you see? Do you want to see pics of Coast Guard :)

Love,
Ally Norm

Monday, July 30, 2012

Nail tutorial: How to Hearts

Mondays mean it is time for manicures. It is MANICURE MONDAY. This really is my favorite day of the week. The day where I try out all the great nail ideas that I find on Pinterest. I'm getting better at painting my nails. It really is a process to paint my nails.

I always make sure to push back the cuticles. This really is a good step to make your manicure better. I picked two OPI colors. Color number one is conquistadorable color and the second color is DS coronation. The DS color is one of the best glitters I've used. It takes several coats but it goes on nicely.

Making a heart on your nails is actually really easy. All you do is make three dots on your nail and connect them with the polish. As I have said the past few times I've done my nails I do not use a dotting tool. I just use the end of a paper clip. I think a dotting tool will be my next purchase.

Here is a little photo to show you how to make the hearts. It's on glossy paper so doesn't look too great.


That is all I had to do for my nails this week. It was simple and easy. I hope you learned something today. I'd sure love to see some comments if you're out there reading this! Another Pinterest manicure Nail'd it.


Love,
Ally Norm

Wednesday, July 25, 2012

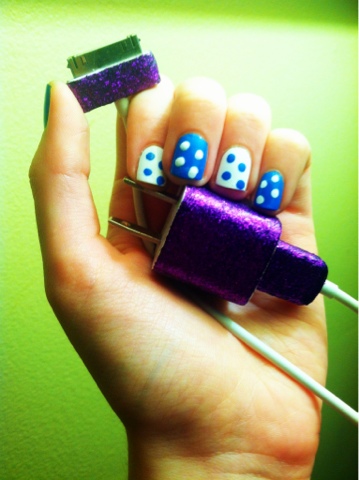
Glitter iPhone charger: A little glitter in your day

In my last craft post I showed how you can wrap your headphones in embroidery floss to make them original. This post is all about making your phone charger more original. It is really easy to do and makes a small amount of time.

Things you will need:
-Phone charger
-Glitter
-Mod podge
-Clear acrylic sealer
-Paint brush
-Mixing bowl
-Tape

This whole tutorial is rather simple.
1. Mix together your glitter and mod podge. I bought extra fine glitter. You can do this with any loose glitter. Also, I mixed it in a sour cream container. I'm really glad that I did or else I would have ruined a nice bowl. My dad would NOT have liked that.


2. Simply use the paint brush to paint on the glitter.It takes a couple of coats so just apply until you're happy. When I glittered the cord I made sure to tape the plug parts so that I didn't get glitter on it and mess things up.

3. After all is dry add a coat of acrylic sealer. BOOM you're done!


I love the way mine turned out. Everyone at my work loved it. My best friend also asked me to do this to her charger. Now I spend my days thinking of everything else I can apply glitter to that is in my house. This really could get bad! Glitter iPhone charger - Nail'd it

Love,
Ally Norm

Monday, July 23, 2012

Nail tutorial: Lots'a dots

This manicure Monday involved dots. I used two different colors that were Sally Hansen's White On and OPIs Orge-the-Top Blue. Orge-the-Top Blue goes on so nicely. It takes two solid coats, and it looks great. Plus, I just love all the names for the OPI colors. This one was from the Shrek collection.

I painted my nails alternating colors. Then with the opposite color added dots. It really is that simple. I do not have a dotting tool for my nails. I really do need to invest in one. Right now I just use the end of a paper clip in order to make the dots.


I have a lot of patience when it comes to doing my nails. I love hearing when people tell me they like my nails, and I can respond, "Thanks I did them myself." I got that a lot with the cheetah nails I blogged about last week.

Stay tune for Wednesday when I will have a tutorial on how to glitter just about anything :) All girls love glitter (hyperbole?)

So, I bid you ado. Nail'd it

Love,
Ally Norm